Since the Microphone is an essential part of communicating in Counter Strike 2, any problem that results in its malfunction may spoil the whole experience. Many users have reported that they aren’t able to use Microphone in CS 2 despite doing everything but fortunately, there are a couple of ways you can fix this problem 100%.
In this post, we are going to take a look at the reasons why a microphone would not work in CS 2 followed by the troubleshooting methods you can execute to fix this problem.
Why Microphone is Not Working in CS 2?
Some users reported that despite messing with Windows and game settings, they can’t seem to figure out why their microphone doesn’t work in the game. It is possible that your microphone is working pretty fine in other applications or was working well even in CSGO, however, the new bug seems to affect the microphone operation in CS 2.
How to Fix Microphone Not Working in CS 2: Step by Step
Here are a few ways through which you can resolve this issue forever. Make sure to follow each method step by step to eliminate every possible reason for the mic malfunction.
Testing Microphone in Windows 10/11
It’s possible that your mic isn’t working at all on your computer by default. A simple Windows mic test would tell you if your microphone is working properly.
At the bottom right corner of your screen, click on the Volume Icon and click on Sounds.
Now select the Recording tab and make sure your preferred Microphone is enabled. Select that microphone and click on Properties.
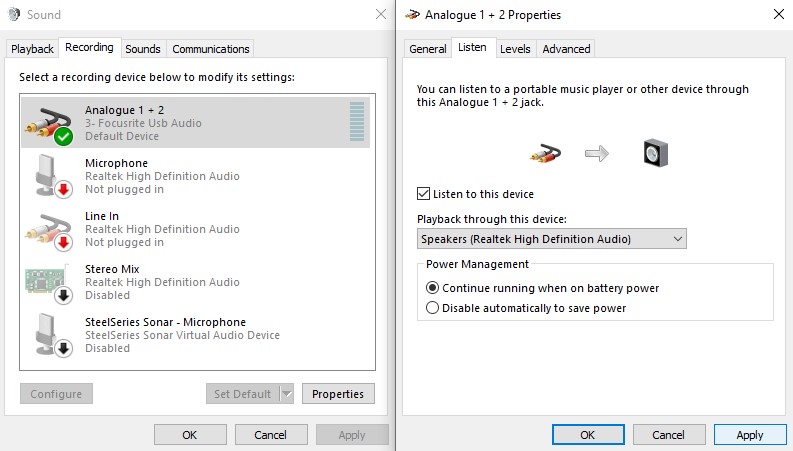
In the Listen tab, enable “Listen to this device” select a Playback audio device, and click Apply.
Now try speaking into the mic and you should be able to listen to your voice.
Increasing Microphone Boost
The bug that apparently affects the mic operation in CS 2 is the high-volume gate. Unlike CSGO, if you don’t speak loudly into the mic, your microphone might not work. This has been reported by numerous users and in order to fix that you have to increase the microphone boost.
You can achieve this through two different methods:
- Microphone Dial
- Windows Settings
Microphone Dial: Many microphones come with a boost dial on the hardware itself. To increase the boost you can turn the dial to the right and now you should have a good boost in microphone input. Do not turn the dial completely to the right or it may distort the output.
Windows Settings: Under the Recording tab in Sound, select your microphone and click on the Levels tab. You should find a Volume and a Microphone Boost slider. Turn the volume to 100% and increase the microphone boost to 10% or higher.
In some cases, the Microphone Boost slider may not be visible. This is because not every microphone supports microphone boost inside the Windows. It is also possible that the Boost slider is missing due to an older microphone driver. So, it’s recommended to update your microphone driver from the Windows itself or from the official manufacturer’s website.
Disable Exclusive Mode
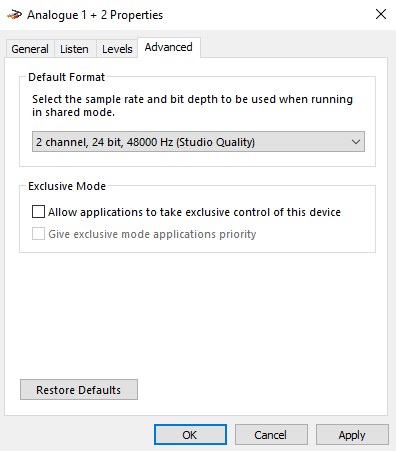
Now that you have configured your microphone properly inside the windows, it’s time to make sure that the game is able to use your preferred microphone.
Open the microphone settings as you did before and select the Advanced tab. Under the Exclusive Mode, Uncheck “Allow applications to take exclusive control of this device” and “Give exclusive mode applications priority” and click on Apply.
Steam Settings
If implementing all the steps above did not resolve the issue, it’s time to check if your Steam microphone settings are set up properly or not. One way is to configure the settings while inside the game and another is when the game is not running.
If the game is running, press Shift+Tab to open the Steam Settings. When outside the game, click on Steam and click on Settings.
Select the Voice tab and now select your preferred Voice Input Device. Start the Microphone test and check if you can listen to your voice.
Now raise the Input volume/gain by moving the slider to the right and you should now be able to hear a louder voice in the microphone test.
Balance the gain until you hear no echoing or distortion in your voice. Under the Voice Transmission Type, make sure you select the Open Microphone option as you can control your mic inside your game however you like.
In-Game Settings
Lastly, run CS 2 and press the hotkey to listen to your voice. If you are not hearing your voice, then you might need to configure some audio settings. One of them is making sure to enable “Streamlined Push to Talk” which has helped users resolve the issue.
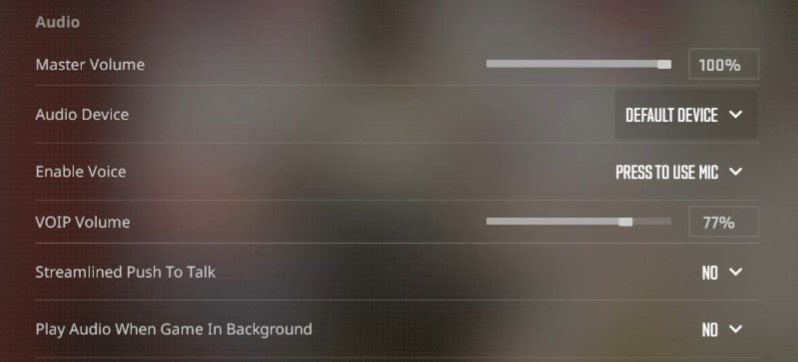
In order to do that, click on Settings Gear and select the Audio tab. In the Audio section, you will find “Streamlined Push to Talk”. Click on the drop-down arrow to change “NO” to “YES”.
Next, select the Keyboard/Mouse tab and assign a Hotkey to use the mic. You can either select a keyboard key or a mouse button as per your comfort.
After successfully following all the above steps, it’s almost guaranteed that you will be able to use your microphone once again unless your microphone is defective.
Frequently Asked Questions
Why is my mic not working on CS 2?
CS 2 requires a higher level of mic input to enable the microphone inside the game. Increasing the mic gain will resolve this problem. However, it’s important to ensure that your microphone is configured properly in both Windows and Steam.
How do I select my mic in CS 2?
Selecting a mic requires you to change your mic device in the Steam Voice Settings as we have shown above.
How do I test if my mic is working?
You can test your microphone through the Windows Sound control panel or inside Steam Voice settings.
How do I set up a mic on Steam?
Open Steam Settings and select the Voice tab. Now select your preferred microphone and increase the volume/gain of the mic. Start the microphone test and listen to your voice.